Tuesday, January 31, 2012

Gmail's Shortcut for Inserting Hyperlinks

Less than 2% of the Gmail users have enabled keyboard shortcuts and actually use them, but that doesn't mean Google shouldn't improve them. Many people complained that Gmail's rich text editor doesn't have a shortcut for inserting hyperlinks and now it's available: Ctrl+K (or Cmd-K if you use a Mac).


The same shortcut is also used in Outlook, Microsoft Word, Google Docs and other apps. "Just select any text, and then press the Ctrl and K keys at the same time. A dialogue box opens where you can type a link," informs the Microsoft Word blog.

I wonder why Google doesn't offer the option to use the top search result for the text you've selected or at least pick one of the top results from the "edit link" box.

{ Thanks, Cougar. }

Country-Specific Blogger URLs

Google found an interesting trick to defend Blogger blogs against local laws: redirect readers to country-specific domains and only remove those URLs if required.

"Over the coming weeks you might notice that the URL of a blog you're reading has been redirected to a country-code top level domain, or 'ccTLD.' For example, if you're in Australia and viewing [blogname].blogspot.com, you might be redirected [blogname].blogspot.com.au. A ccTLD, when it appears, corresponds with the country of the reader's current location," explains Google.

"Migrating to localized domains will allow us to continue promoting free expression and responsible publishing while providing greater flexibility in complying with valid removal requests pursuant to local law. By utilizing ccTLDs, content removals can be managed on a per country basis, which will limit their impact to the smallest number of readers. Content removed due to a specific country's law will only be removed from the relevant ccTLD." That means [blogname].blogspot.com will continue to exist, but it's not clear if the users from that specific country will still be able to access it.

Blogger will start to use country-specific domains, just like many other Google services. If you're in Australia and visit google.com, you'll be redirected to google.com.au, but you can opt-out by clicking "Go to Google.com" or visiting google.com/ncr. The same option is available for Blogger: "Blog readers may request a specific country version of the blogspot content by entering a specially formatted NCR URL. NCR stands for 'No Country Redirect' and will always display [blogname].blogger.com in English, whether you're in India, Brazil, Honduras, Germany, or anywhere. For example: http://[blogname].blogspot.com/ncr – always goes to the U.S. English blog."

Google doesn't mention the list of countries that are affected by this change, but Techdows.com reports that India is one of them. Obviously, blog owners can use custom domains if they don't like the new feature. Even if Google made sure that the duplicate URLs are properly handled by search engines, it could be annoying to see so many URLs that send people to the same page.

{ Thanks, Venkat and Herin. }

Monday, January 30, 2012

Android Developers on Google+

[This post is by Reto Meier, Android Developer Relations Tech Lead. — Tim Bray]

I’ve been fortunate enough to be involved with Android since the 0.9 preview SDK was released to developers back in 2007. A lot has changed since then, but one thing that hasn’t is the rapid pace at which new tools, resources, and information have become available for us Android developers. Just look at the last few months.

In December Android Training launched, with its first set of classes designed to demonstrate the best practices behind building great Android Apps.

Earlier this month, the Android design site went live — offering a place to learn about the principles, building blocks, and patterns you need to make good design decisions when creating your Android app interfaces.

We’ve got a lot more planned in the coming year, so to help you keep abreast of all the latest Android developer news we’re launching the +Android Developers page on Google+!

One of my favourite things about Google+ is the quality of conversation around posts, so +Android Developers will focus on being a place for the people behind the Android developer experience, and Android developers all around the world, to meet and discuss the latest in Android app development.

We’ll be posting development tips, discussing updates to the SDK and developer tools, highlighting new Android training classes, and posting video and pics from Android developer events around the world.

We’ll also be using Google+ Hangouts to help us all interact even more closely. Starting with weekly broadcast office-hours on Hangouts On Air to answer Android development questions. These will happen every Wednesday at 2pm Pacific Time (10pm UTS) in Mountain View—expect to see these hangouts in more time zones as our teams in London, Sydney, and Tokyo get involved. Each hangout will be recorded for YouTube, so if you can’t join us live you won’t miss out.

It turns out that hangouts are a lot of fun, so we’ll be doing more of these that feature interviews with Google engineers and 3rd party Android app developers willing to share their tips and experiences.

We’re looking forward to interacting with you even more closely, so add us to your circles, join the conversation by commenting on posts, and join the hangouts. We can't wait to hear what you have to say.

Friday, January 27, 2012

Google+ and the Post-Web Google

I've noticed an increasing number of ads that no longer send people to the company's sites. Instead, the ads only include a link to the official Facebook page. Sites suddenly look outdated, no longer include the latest information and people stop visiting them.


There are still people that visit those outdated sites and many are coming from search engines like Google. Despite Google's efforts to have a comprehensive index, there's a growing subset of the Web it can't properly index and that's Facebook. Sure, Google indexes a lot of Facebook pages, but that's like trying to find your keys in a dark room. Google needs Facebook's map to index all the pages and find the connections between pages and between users, but Facebook is not willing to license this valuable data to the most important competitor. Google tried to make the web social and failed, so now the only option to stay relevant is to build an alternative to Facebook's walled garden and that's Google+.

+1s are the new links, authors have profiles, companies have social pages and this new universe will try to coexist with the old Web in Google's search results. Google tried to focus on the users and find ways to make the social Web more open, but now it has to focus on itself and do everything it can to stay alive and maybe even save the Web. "Google's mission is to organize the world's information and make it universally accessible and useful," but that's impossible if it can't access, understand and rank that information.

Back in 1996, Larry Page and Sergey Brin used links to determine the importance of a Web page. Now links and pages are no longer that important and the old rule of trying to send people to other sites as quickly as possible is difficult to apply. Showing personalized results requires understanding users better, encouraging them to share more content and create connections. In many ways, Google+ is the anti-Google and that's why it's difficult to understand some of the new features.

Thursday, January 26, 2012

Google+ Now Open for Teens

Google+ changed the age requirements so that any Google Account user can join Google+. In most countries you need to be at least 13 years old to create a Google Account and join Google+, but there are 3 exceptions: Spain, South Korea and Netherlands. Until now, Google+ required to be at least 18 years old to "upgrade" your account.

Google's VP Bradley Horowitz mentioned that there are a few tweaks and new default settings for teens. By default, only the people from teens' circles can trigger notifications and comment on their public posts. If someone outside a teen's circles joins a hangout, Google+ temporarily removes the teen from the hangout and gives him a chance to rejoin.


Teens and young adults are the most active Internet users on the planet. And surprise, surprise: they're also human beings who enjoy spending time with friends and family. Put these two things together and it's clear that teens will increasingly connect online. Unfortunately, online sharing is still second-rate for this age group.

In life, for instance, teens can share the right things with just the right people (like classmates, parents or close ties). Over time, the nuance and richness of selective sharing even promotes authenticity and accountability. Sadly, today's most popular online tools are rigid and brittle by comparison, so teens end up over-sharing with all of their so-called "friends."

With Google+, we want to help teens build meaningful connections online. We also want to provide features that foster safety alongside self-expression. Today we're doing both, for everyone who's old enough for a Google Account.

It's interesting that the updated form for creating a Google Account doesn't automatically create a profile and doesn't add the user to Google+ if he's not at least 18 years old.

{ Thanks, Oskar. }

Say Goodbye to the Menu Button

[This post is by Scott Main, lead tech writer for developer.android.com. — Tim Bray]

Before Android 3.0 (Honeycomb), all Android-powered devices included a dedicated Menu button. As a developer, you could use the Menu button to display whatever options were relevant to the user, often using the activity’s built-in options menu. Honeycomb removed the reliance on physical buttons, and introduced the ActionBar class as the standard solution to make actions from the user options immediately visible and quick to invoke. In order to provide the most intuitive and consistent user experience in your apps, you should migrate your designs away from using the Menu button and toward using the action bar. This isn’t a new concept — the action bar pattern has been around on Android even before Honeycomb. As Ice Cream Sandwich rolls out to more devices, it’s important that you begin to migrate your designs to the action bar in order to promote a consistent Android user experience.

You might worry that it’s too much work to begin using the action bar, because you need to support versions of Android older than Honeycomb. However, it’s quite simple for most apps because you can continue to support the Menu button on pre-Honeycomb devices, but also provide the action bar on newer devices with only a few lines of code changes.

If I had to put this whole post into one sentence, it’d be: Set targetSdkVersion to 14 and, if you use the options menu, surface a few actions in the action bar with showAsAction="ifRoom".

Don’t call it a menu

Not only should your apps stop relying on the hardware Menu button, but you should stop thinking about your activities using a “menu button” at all. Your activities should provide buttons for important user actions directly in the action bar (or elsewhere on screen). Those that can’t fit in the action bar end up in the action overflow.

In the screenshot here, you can see an action button for Search and the action overflow on the right side of the action bar.

Even if your app is built to support versions of Android older than 3.0 (in which apps traditionally use the options menu panel to display user options/actions), when it runs on Android 3.0 and beyond, there’s no Menu button. The button that appears in the system/navigation bar represents the action overflow for legacy apps, which reveals actions and user options that have “overflowed off the screen.”

This might seem like splitting hairs over terminology, but the name action overflow promotes a different way of thinking. Instead of thinking about a menu that serves as a catch-all for various user options, you should think more about which user options you want to display on the screen as actions. Those that don't need to be on the screen can overflow off the screen. Users can reveal the overflow and other options by touching an overflow button that appears alongside the on-screen action buttons.

Action overflow button for legacy apps

If you’ve already developed an app to support Android 2.3 and lower, then you might have noticed that when it runs on a device without a hardware Menu button (such as a Honeycomb tablet or Galaxy Nexus), the system adds the action overflow button beside the system navigation.

This is a compatibility behavior for legacy apps designed to ensure that apps built to expect a Menu button remain functional. However, this button doesn’t provide an ideal user experience. In fact, in apps that don’t use an options menu anyway, this action overflow button does nothing and creates user confusion. So you should update your legacy apps to remove the action overflow from the navigation bar when running on Android 3.0+ and begin using the action bar if necessary. You can do so all while remaining backward compatible with the devices your apps currently support.

If your app runs on a device without a dedicated Menu button, the system decides whether to add the action overflow to the navigation bar based on which API levels you declare to support in the <uses-sdk> manifest element. The logic boils down to:

  • If you set either minSdkVersion or targetSdkVersion to 11 or higher, the system will not add the legacy overflow button.


  • Otherwise, the system will add the legacy overflow button when running on Android 3.0 or higher.


  • The only exception is that if you set minSdkVersion to 10 or lower, set targetSdkVersion to 11, 12, or 13, and you do not use ActionBar, the system will add the legacy overflow button when running your app on a handset with Android 4.0 or higher.


That exception might be a bit confusing, but it’s based on the belief that if you designed your app to support pre-Honeycomb handsets and Honeycomb tablets, it probably expects handset devices to include a Menu button (but it supports tablets that don’t have one).

So, to ensure that the overflow action button never appears beside the system navigation, you should set the targetSdkVersion to 14. (You can leave minSdkVersion at something much lower to continue supporting older devices.)

Migrating to the action bar

If you have activities that use the options menu (they implement onCreateOptionsMenu()), then once the legacy overflow button disappears from the system/navigation bar (because you’ve set targetSdkVersion to 14), you need to provide an alternative means for the user to access the activity’s actions and other options. Fortunately, the system provides such a means by default: the action bar.

Add showAsAction="ifRoom" to the <item> elements representing the activity’s most important actions to show them in the action bar when space is available. For help deciding how to prioritize which actions should appear in the action bar, see Android Design’s Action Bar guide.

To further provide a consistent user experience in the action bar, we suggest that you use action icons designed by the Android UX Team where appropriate. The available icons support common user actions such as Refresh, Delete, Attach, Star, Share and more, and are designed for the light and dark Holo themes; they’re available on the Android Design downloads page.

If these icons don’t accommodate your needs and you need to create your own, you should follow the Iconography design guide.

Removing the action bar

If you don’t need the action bar, you can remove it from your entire app or from individual activities. This is appropriate for apps that never used the options menu or for apps in which the action bar doesn’t meet design needs (such as games). You can remove the action bar using a theme such as Theme.Holo.NoActionBar or Theme.DeviceDefault.NoActionBar.

In order to use such a theme and remain backward compatible, you can use Android’s resource system to define different themes for different platform versions, as described by Adam Powell’s post, Holo Everywhere. All you need is your own theme, which you define to inherit different platform themes depending on the current platform version.

For example, here’s how you can declare a custom theme for your application:

<application android:theme="@style/NoActionBar">

Or you can instead declare the theme for individual <activity> elements.

For pre-Honeycomb devices, include the following theme in res/values/themes.xml that inherits the standard platform theme:

<resources>
<style name="NoActionBar" parent="@android:style/Theme">
<!-- Inherits the default theme for pre-HC (no action bar) -->
</style>
</resources>

For Honeycomb and beyond, include the following theme in res/values-v11/themes.xml that inherits a NoActionBar theme:

<resources>
<style name="NoActionBar" parent="@android:style/Theme.Holo.NoActionBar">
<!-- Inherits the Holo theme with no action bar; no other styles needed. -->
</style>
</resources>

At runtime, the system applies the appropriate version of the NoActionBar theme based on the system’s API version.

Summary

  • Android no longer requires a dedicated Menu button, some devices don’t have one, and you should migrate away from using it.


  • Set targetSdkVersion to 14, then test your app on Android 4.0.


  • Add showAsAction="ifRoom" to menu items you’d like to surface in the action bar.


  • If the ActionBar doesn’t work for your app, you can remove it with Theme.Holo.NoActionBar or Theme.DeviceDefault.NoActionBar.

For information about how you should design your action bar, see Android Design’s Action Bar guide. More information about implementing the action bar is also available in the Action Bar developer guide.

Wednesday, January 25, 2012

Two Ways to Export Your Google Docs

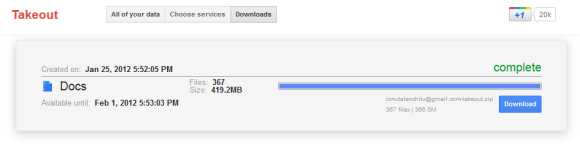
Google Takeout supports a new service: Google Docs. Now you can use the same interface to batch export your documents.


I tried both Google Takeout and the built-in feature from Google Docs that lets you download your documents. Even if they have the same purpose, they're quite different. The Google Docs feature is more flexible: you can choose to download only spreadsheets or presentations and skip all the other documents. You can also skip the files uploaded to Google Docs and not converted to a Google Docs format (for example: PDF files, archives and video files). Google Takeout has a "configure" feature, but you can't skip one or more document types. Another subtle difference is that Google Takeout lets you export only the files that you own, while Google Docs exports all the files from your account.


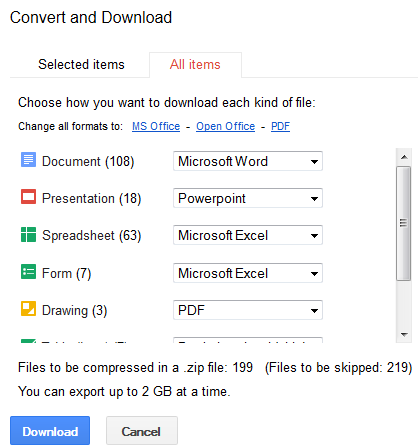
How to export all your files from Google Docs? Just go to the Google Docs homepage, select one or more documents, click "More" and then "Download", click the "All items" tab, pick your favorite formats and click "Download". The process is not that intuitive and you shouldn't have to select a file to see the download option.

{ via Data Liberation Blog }