Thursday, January 31, 2013

Custom Date Range Tips for Google Search

Google's search engine has a cool feature that lets you restrict the results to a certain time range. It's mostly used to find recent results, so the default options are: past hour, past 24 hours, past week/month/year, but you can customize the time range. Just click "search tools" below the search box, then click "any time" and select "custom range" from the list.


You can use Google's calendar widget to pick the dates, but there are some tricks that help you enter dates faster:

1. Enter "2011" in the "from" field, instead of "1/1/2011". Obviously, you can use any other year.

2. Enter "3/2011" or "March 2011" in the "from" field, instead of "3/1/2011" (or "1/3/2011", depending on your country).

3. Enter "2011" in the "to" field, instead of "12/31/2011" (or "31/12/2011", depending on your country). Obviously, you can use any other year.

4. Enter "3/2011" or "March 2011" in the "to" field, instead of "3/31/2011" (or "31/3/2011", depending on your country).


5. To restrict the results to pages from 2011, enter "2011" in the "from" and "to" fields.


6. To restrict the results to pages from March 2011, enter "3/2011" in the "from" and "to" fields.

7. Leave the "to" field empty instead of entering today's date.

8. Leave the "from" field empty to find pages created before the day entered in the "to" field.

Monday, January 28, 2013

Offline Google Slides

Google Slides is just another name for Google Presentations, but that's not actually new. The big news is that you can now use Google Slides offline to create, edit and run presentations. "Any new presentations or changes you make will be automatically updated when you get back online. So you can continue polishing slides on your next flight, and head to your upcoming presentation without worrying about whether there's going to be wifi."


The offline functionality is still limited to Chrome and requires the Google Drive app from the Chrome Web Store. If you've already enabled the offline support and use it for documents and spreadsheets, you don't need to do anything.

This table shows which Google Drive features are available when you're offline and you use Chrome for desktop or the mobile apps for iOS and Android. You can sync any file when you use the mobile apps, but the editing support is better in the desktop Chrome. You can also install the Google Drive app for Windows and Mac to sync the files that can't be edited online using Google Docs, Sheets, Slides and Drawings.

Quickly Switch to the Basic Google Image Search

If you don't like the new Google Image Search interface, you can't go back to the previous interface. Fortunately, Google still includes a link to a much older interface without infinite scrolling, but with useful information like the file size and a page snippet.

Infinite scrolling makes it difficult to get to the bottom of the page because Google continuously loads new image results as you scroll down. The best way to find the link that switches to the old interface is to press "End" on your keyboard (Fn + Right Arrow if you have a Mac) and click "switch to basic version". Google doesn't remember your setting, so the switch is not persistent.


New Google Image Search Interface

Long time, no see. After a long vacation, it's time to get back to the latest news from the Google world. Last month, Google tested a new image search interface and now it's been rolled out. It's the first desktop interface that drops the landing page and no longer loads the web pages that included the image results. The previous interfaces loaded these pages using iframes more like a courtesy to the third-party websites than to improve the user experience.

Google started to make the iframes less important when it moved them to the background. Then the mobile interfaces for smartphones and tablets came out and they didn't even load the original web pages. The new desktop interface is closer to the tablet interface: click an image result and use the left/right keyboard arrows to check the other results.


Here's the old interface (you may still see it):


"Instead of sending you over to a whole new page to preview an image, you'll see a preview of the image in your search results. Once you click on a image, you can quickly flip through the whole set of image previews using your keyboard. Your search results stay in the panel so you don't lose track of what you were doing; if you want to go back to looking at other search results, you can just scroll down and pick up right where you left off. If you want to check out the website where the image is hosted, you can click on the photo or use the tools available," explains Google.

Obviously, the traffic from Google Image Search will drop dramatically and webmasters will complain that Google uses their images and doesn't give anything in return. Google only hosts image thumbnails and loads the original images when you click the thumbnails, so it's now an image leecher that hotlinks to other people's images, using their bandwidth without generating page views or ad revenue. It's better for users, but expect to see many sites that stop displaying images when loaded from Google Image Search or use other anti-leech tricks.

Finding the right balance between user experience and webmasters' interests is a hard thing to do. Google now includes 4 links to the original web page, so you can click the image, the page title, the domain name and the "visit page" button, but I bet most people will click "view original image". Unfortunately, Google no longer displays two very important things: the image title and a short snippet from the page related to the image. Showing only the title of the page and the domain name is not enough to determine if the image is relevant. Other missing information: the EXIF data and the image size.

Tuesday, January 15, 2013

Android Developer Story: Smule

Check out our latest Android developer story, this one from Smule, creators of AutoRap, Magic Piano, and Songify.


In this short video, the Smule team talks about their experiences launching on Android, the explosive global growth they’ve seen on Google Play, and some of the techniques they use to market and monetize their products effectively across the world.


Visit the Spotlight pages in the Android Developers site to see our growing list of developer stories.


Monday, January 14, 2013

Evolution of Renderscript Performance

Posted by R. Jason Sams, Android Renderscript Tech Lead


It’s been a year since the last blog post on Renderscript, and with the release of Android 4.2, it’s a good time to talk about the performance work that we’ve done since then. One of the major goals of this past year was to improve the performance of common image-processing operations with Renderscript.


Renderscipt optimizations chartstyle="border:1px solid #ddd;border-radius: 6px;" />

Figure 1. Renderscript image-processing benchmarks run on different Android platform versions (Android 4.0, 4.1, and 4.2) in CPU only on a Galaxy Nexus device.


Figure 2. Renderscript image-processing benchmarks comparing operations run with GPU + CPU to those run in CPU only on the same Nexus 10 device.


When you set out to improve performance, the first task is to measure it. To do this, we built a image-processing benchmark suite. The tests measure how long it takes to apply a given image processing operation to a roughly 1.7 million pixel bitmap. We then ran the benchmark using the same APK on the Galaxy Nexus and normalized the results from Ice Cream Sandwich to 1.0.


We made a few major improvements between ICS and Jelly Bean, which significantly reduced the overhead of short scripts as well as the cost of getting elements out of allocations. Going from Android 4.1 to Android 4.2, we added a number of performance improvements to the math library. Our hardware partners also made major contributions; ARM in particular provided numerous compiler improvements which greatly improved our ability to generate vector code.


Android 4.2 introduced another much more important change: For the first time on any mobile platform. we can use the GPU as a compute device. When run on a device that supports GPU compute, that same benchmark APK will run on the GPU. The chart in Figure 2 is normalized to the same basis as Figure 1.


The Cortex A15 in Nexus 10 is a very good CPU. However, that doesn’t mean we should leave resources idle. The Mali T604 is a very flexible and capable compute device capable of executing a large subset of RenderScript functionality. The green bar in Figure 2 shows what we can do when the Mali is enabled for RS compute. No effort is required on an app developer's part to enable this acceleration; the device will inspect each script and decide which processor to run things automatically. It’s important to note that some scripts can’t be run on the GPU, and such scripts will automatically run on the CPU.


The best part is it doesn’t end here. Performance work is an ongoing effort. RenderScript performance in applications will continue to improve over time as we continue to improve the platform.


To learn more about using Renderscript, see the Renderscript Computation developer's guide.


Tuesday, January 8, 2013

Verifying Back-End Calls from Android Apps

Posted by Tim Bray

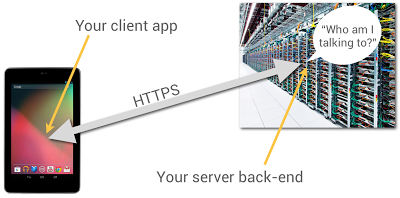
Most Android apps have some sort of server-side back end, to persist and share data. Even the most basic game needs to remember its players’ high scores. When you’re building your back end, one problem you have to solve is how the back-end code knows what app it’s talking to and who the person using it is.

You probably have HTTP endpoints for communicating with your client apps, but how can the server-side code be sure who’s sending messages to it? After all, anyone can send HTTP POST requests from anywhere; could they impersonate your users if they could guess their identities?

It’s really user-unfriendly to ask people to type in usernames and passwords on mobile devices. In particular, if someone has installed your app and given it permission to use the Internet and know your identity, they shouldn’t be pestered any more.

It turns out that Google Play services, now available on every compatible device running Android release 2.2 or higher, offers a good solution to this problem, based on the use of Google Accounts.

Summary

Doing this is a multi-step process, which I’ll outline in full, but here’s the short version: You use the GoogleAuthUtil class, available through Google Play services, to retrieve a string called an “ID Token”. You send the token to your back end and your back end can use it to quickly and cheaply verify which app sent it and who was using the app.

This capability is built into Google facilities such as App Engine’s new Cloud Endpoints feature, which bakes app/back-end identity into a simple programming model.

Now let’s get to the details.

App Registration

You’re going to have to use the Google API Console quite a bit in this process. You’ll need to make a new project for this purpose; while you can give it a nice human-readable name and graphical branding, it turns out that those resources aren’t used in this particular scenario.

You can also authorize this project to access a large number of different Google APIs; but once again, you don’t need to in this scenario.

You should give serious thought to the people you authorize as members of the project, since these are important administrative roles.

Make Client IDs

You’ll need to make two different OAuth 2.0 “Client IDs” for your project. The first one is a “Client ID for Web applications”. Once again, you can ignore all the labeling and branding stuff, you’ll just need the Client-ID string, which will look something like 9414861317621.apps.googleusercontent.com.

Now you’ll need to make another Client ID for your Android app. To do this, you’ll need to provide two pieces of information: your app’s package name and cert signature. The package name is just the Java-style reverse-DNS, as given in the top-level “package” attribute in your AndroidManifest.xml, for example com.example.identity.

To get your app’s cert signature, use the following shell command:

$ keytool -exportcert -alias <your-key-name> -keystore <your-key-store-file> -v -list

Copy the octets labeled “SHA1”, paste them into the Developer Console field, and create your app’s Client ID. Once again, all you’ll really need from the readout is the Client-ID string.

In Your Android App

You’ll need to call the Google Play services GoogleAuthUtil class to get an ID token; the procedure is as described in Obtaining an Access Token. There’s one extra bit of magic: the value of the scope argument to the getToken(email, scope) method. It has to be the string audience:server:client_id:X, where X is the Client ID of for the Web app, as described above. If our Client ID were the example value given above, the value of the scope argument would be audience:server:client_id:9414861317621.apps.googleusercontent.com.

Magic Happens

Normally, when you ask for an OAuth token, the person using the device sees a challenge, asking them if it’s OK to use their identity to get at some resource or other. But in this case, the system looks at the server-side Client ID in your scope argument, notices that it’s in the same project as your Android app, and gives you the token without pestering the user; they’ve already agreed to a relationship with you, the developer who controls that project.

Send the Token

When you’re ready to start talking to your server back end, you need to send the token string to it. The best way to do this is in the body of an POST message; you could put it in a URL parameter, but they’re often logged. You absolutely must use an HTTPS connection, to keep any men-in-the-middle from peeking at your token.

There’s no particular reason for extra round-trips; if you’re sending a game high score to your back end, just stick the ID Token string in as an extra argument.

Use the Token

When your server receives the token from your Android app, it’s really important that you verify it. This requires two steps:

  1. Verify that it’s really signed by Google.

  2. Verify that it’s really meant for you.

Verify Signature

It turns out that this is signed using a Google public/private key pair, and Google publishes the public keys (which we change regularly) at www.googleapis.com/oauth2/v1/certs; go ahead and have a look.

You have to verify that the ID Token, which is actually a JSON Web Token, was signed with one of those certs. Fortunately, there are decent libraries around to do this; in this post, I’ll give pointers for Java, Ruby, and PHP.

The libraries can cache the Google certs and only refresh them when required, so the verification is (almost always) a fast static call.

Verify Token Fields

It turns out that the ID Token has a JSON payload, and most libraries that validate the signatures also give it to you as a hash or dictionary or whatever. Thus, you can retrieve named fields, such as aud and azp and email.

First, you have to look at the field named aud and verify that it’s identical to your Client ID, the string you included in the Android app’s scope argument. Seriously, do not omit this step; if you don't verify the ID Token, then any other developer can spoof requests to your service.

Optionally, you can look at the field named azp (stands for “authorized party”) and verify that it is identical to the Client ID of your Android app. By the way, you can have multiple different Android client apps, each with its own Client ID, in that top-level project.

Let’s assume you’ve done all three of these things. Then, you know that:

  1. The token was issued by Google.

  2. The token was sent to a device that was being operated by the person identified in the payload's email field.

You also have high confidence that:

  1. The token was obtained by the Android app identified by the Client ID in the payload’s azp field.

The Client ID only has “high confidence” because non-compatible or rooted Android devices may be able to tamper with that information. But they won't be able to fake the Google signature or the authentication of the device user to Google.

What’s Next?

That’s up to you. You know which person and app you’re talking to, it’s up to you what to do with that information.

Code Fragments

Here’s a Java class that implements an ID-Token checker using the Google Java libraries:

import java.io.IOException;
import java.security.GeneralSecurityException;

import com.google.api.client.googleapis.auth.oauth2.GoogleIdToken;
import com.google.api.client.googleapis.auth.oauth2.GoogleIdTokenVerifier;
import com.google.api.client.http.javanet.NetHttpTransport;
import com.google.api.client.json.JsonFactory;
import com.google.api.client.json.gson.GsonFactory;

public class Checker {

private final List mClientIDs;
private final String mAudience;
private final GoogleIdTokenVerifier mVerifier;
private final JsonFactory mJFactory;
private String mProblem = "Verification failed. (Time-out?)";

public Checker(String[] clientIDs, String audience) {
mClientIDs = Arrays.asList(clientIDs);
mAudience = audience;
NetHttpTransport transport = new NetHttpTransport();
mJFactory = new GsonFactory();
mVerifier = new GoogleIdTokenVerifier(transport, mJFactory);
}

public GoogleIdToken.Payload check(String tokenString) {
GoogleIdToken.Payload payload = null;
try {
GoogleIdToken token = GoogleIdToken.parse(mJFactory, tokenString);
if (mVerifier.verify(token)) {
GoogleIdToken.Payload tempPayload = token.getPayload();
if (!tempPayload.getAudience().equals(mAudience))
mProblem = "Audience mismatch";
else if (!mClientIDs.contains(tempPayload.getIssuee()))
mProblem = "Client ID mismatch";
else
payload = tempPayload;
}
} catch (GeneralSecurityException e) {
mProblem = "Security issue: " + e.getLocalizedMessage();
} catch (IOException e) {
mProblem = "Network problem: " + e.getLocalizedMessage();
}
return payload;
}

public String problem() {
return mProblem;
}
}

If you wanted to do this in Ruby, you’d want to install the google-id-token Ruby gem, and do something like this:

require 'google-id-token'
validator = GoogleIDToken::Validator.new
jwt = validator.check(token, required_audience, required_client_id)
if jwt
email = jwt['email']
else
report "Cannot validate: #{validator.problem}"
end

For PHP programmers, check out the Google APIs Client Library for PHP, in particular the function verifyIdToken in apiOAuth2.php.