Showing posts with label Tips. Show all posts

Monday, August 19, 2013

Find the Number of Files From a Google Drive Folder

Google Drive lacks many basic features. For example, it's not easy to tell how many files are in a folder. Here's a way to do that:

Method #1: convert and download

1. right-click a folder
2. click "Download"
3. you'll find the number of files after waiting a few seconds. Sometimes, Google doesn't show the number of files and you should try again
4. click "Cancel".


If Google doesn't show the number of files, there's another way:

Method #2: move to

1. open the folder
2. repeatedly scroll down until you reach the end the folder. You can use the End key
3. select all the files using Shift+A
4. click "More" and "Move to"
5. click "Cancel".

"Move to" doesn't count the files from subfolders.


There's another option for folders with less than 500 files:

Method #3: folder view

1. open the parent folder
2. ctrl+click the target folder in the main view
3. you'll see the number of files in the page that opens in a new tab. This only shows the number of files if the folder has 500 files or less. If the folder has more than 500 files, you'll still see "500 items". That's a limitation of the folder sharing feature, which only includes the first 500 files from a folder.


Method #4: the Drive app

Probably the best option is to install the Google Drive app and quickly find the number of files of each Google Drive folder. If you use Windows Explorer, right-click the folder and select "Properties".


{ Thanks, Sushubh. }

Sunday, August 18, 2013

Chrome for Android's Find in Page Icon

Chrome for Android has a "find in page" icon that's easy to miss. When you type some keywords in the omnibox, you can tap the icon highlighted in the screenshot below to find the matches from the currently loaded page. If you tap to the left of the icon, you'll search the web.


When you tap the "find in page" icon, you'll see the same interface that's available when you use the "find in page" feature from the Chrome menu. Use the up/down arrows to see the next/previous match, tap the yellow bars from the scrollbar to go to one of the matches or use the special "find in page" scrollbar.


Even if you close the find bar, you can easily open it again from Chrome's menu. The nice thing is that Chrome remembers your keywords and the current match.

Tuesday, August 13, 2013

Mobile Gmail Enhances YouTube Links

Gmail's mobile site has a cool feature that adds video titles to all the YouTube links from a message. They're still links, but you know more about the videos before clicking them.

Here's an example from Gmail's mobile web app in Chrome for Android:


This also works in Gmail's iOS app and Gmail's mobile web app in other Android/iOS browsers. The message from this screenshot only included a link to a YouTube video, with no special anchor text.

Sunday, August 4, 2013

20 Things to Do Using YouTube's Embedded Player

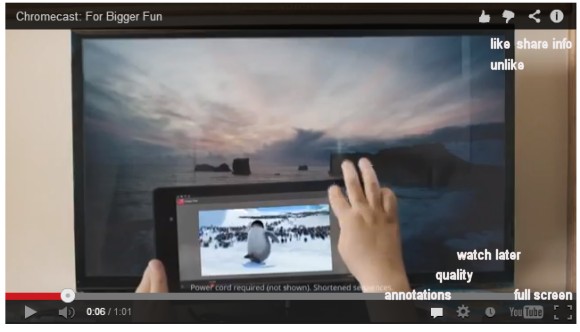
Here are some things you can do from an embedded YouTube player:


1. like/unlike the video: use the thumbs up/down buttons from the top-right corner (you need to be logged in).

2. find the video's URL: right-click the video and click "copy video URL". You can also "copy video URL at current time".

3. find the embedding code: right-click the video and click "copy embed code".

4. share the video: use the share button from the top-right corner and click Facebook, Twitter or Google+.

5. read the video's description: click the "i" button from the top-right corner.

6. subscribe to the video's channel: click the "i" button from the top-right corner and then click the "subscribe" button.

7. find the number of views: click the "i" button from the top-right corner.

8. add the video to the "watch later" playlist: click the "clock" button next to the YouTube logo.

9. turn off annotations: click the conversation icon at the bottom.

10. enable captions: click the "CC" button. To disable them, click the same button and then "turn captions off".

11. move captions: use drag&drop to change their position.

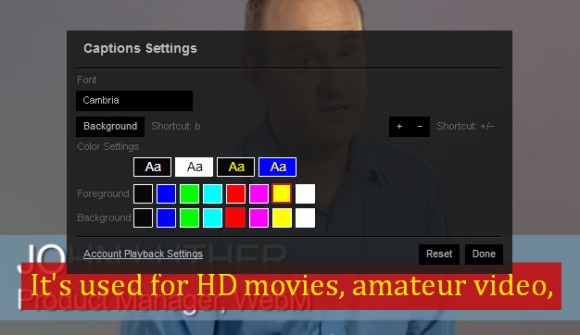
12. change caption size: use + or - keyboard shortcuts. You can also change the caption's foreground/background colors and the font: click the "CC" button and pick "caption settings". Click "background" to enable the caption background (there's also a keyboard shortcut: b). Your settings are saved and YouTube will used them for other videos.


13. translate captions: click the "CC" button, then "translate captions" and pick a language.

14. open the video in full screen mode: click the "full screen" icon next to the YouTube logo.

15. change video quality: click the wheel icon and choose from auto, 144p, 240p, 360p, 480p, 720p, 1080p.

16. change the video's speed (only in the HTML5 player): click the wheel icon and choose from 0.25x, 0.5x, 1x, 1.5x, 2x.

17. check the stats: right-click the video and select "stats for nerds" to see the video's size, the number of frames per second, the number of dropped frames and other useful information.

18. open the video's YouTube page: click the title at the top of the player or the YouTube logo at the bottom.

19. use keyboard shortcuts (most shortcuts only work in the Flash player and they require that the video player has focus):

* k - pause/play the video
* m - mute/unmute the video
* f - full screen mode (Esc to exit)
* j or left arrow - seek backward 3 seconds
* l or right arrow - seek forward 3 seconds
* 0 - jump at the beginning of the video
* 1-9 - seek to the 10% to 90% of the video
* home/end - jump at the beginning/end of the video
* up/down arrows - increase/decrease volume by 5%

20. related videos: at the end of the video, you'll see a list of related videos and you can watch them in the embedded player. Mouse over the thumbnails to find more information about the videos.

Here's a video you can use to test these features:

Friday, August 2, 2013

Partial YouTube Embeds

Let's say you want to embed a long YouTube video, but you only need a short excerpt from that video. The Nexus 7 & Chromecast Press Event video has 64 minutes, but you only want to embed the part about Android stats from 02:50 to 06:28.

Start with the standard embedding code:

<iframe allowfullscreen="" frameborder="0" height="315" src="//www.youtube.com/embed/GbXeZ16FoCY" width="560"></iframe>

Then add the start and end parameters. Both use seconds, so you'll need to convert minutes to seconds. For my example:

* 02:50 = 2 minutes and 50 seconds = 2*60+50 seconds = 170 seconds, so start=170
* 06:28 = 6 minutes and 30 seconds = 6*60+28 seconds = 388 seconds, so end=388.

Here's the final code. You only need to add the underlined text in red:

<iframe allowfullscreen="" frameborder="0" height="315" src="//www.youtube.com/embed/GbXeZ16FoCY?start=170&end=388" width="560"></iframe>

Here's the video embed:


When you click the play button, YouTube will only play the excerpt you've selected. This works for both the Flash player and the HTML5 player. Visitors can always use the seek bar and skip to other part of the video or continue to watch the video.

Monday, July 29, 2013

Keyboard Shortcut for Google Voice Search

If you use Chrome, you've probably noticed the small microphone icon from Google's search box. It lets you search Google using your voice and it's now just as good as the voice search feature from Google's mobile apps.

There's even a keyboard shortcut for this feature: Ctrl+Shift+. (or ⌘-Shift-. for Mac). Yes, that's a dot, full stop or period.


"Say your question and hear an answer back on your desktop Chrome browser. All you will need is a built-in or attached microphone. Also, be sure to have the volume up on your computer to hear your answer loud and clear. Please note Voice Search with spoken answers back is available for US English only," informs Google.

"Open the Chrome browser and go to http://www.google.com/. You'll see a small gray microphone on the right-hand side of the search box. Click the microphone or press Ctrl+Shift+Period (Mac: ⌘-Shift-Period) with your cursor in the search box to start voice search. When the large red microphone icon appears, begin speaking. You can press ESC or click the red button to cancel. As you speak, Google will interpret your voice input. Afterwards, your results show up just as if you had typed the search term," mentions a help center article.

{ via Mike Downes }

Thursday, July 25, 2013

Find Auto Awesome Google+ Images

Google+ has a feature called Auto Awesome, which automatically creates new photos that use the photos you've uploaded. For example, when you upload similar images at different exposures, Google+ will add an image that simulates HDR. When you upload a series of photos in succession, Google+ will create an animated image. "If you've taken a series of photos with overlapping landscape views, Auto Awesome will stitch these photos together into a panoramic image."

Unfortunately, it's not always easy to find these images. Here's a way to find the animated images created by Google: go to Google+ Photos and search for [motion.gif]. This works because all the animated GIFs created by Google+ include "motion" in the filename. You may also find other images that include "motion" in the filename or caption, but they weren't created by Google+. The nice thing is that Google's thumbnails are also animated GIFs, so it's easy to spot Auto Awesome images.

If you can't find Auto Awesome animated GIFs, click "From your circles" below the search box and you'll certainly find some GIFs if you follow the right people.

This post should have an included an animated screenshot, but I decided to add a YouTube video:


If you'd like to find panoramic images, search for pano.jpg. For HDR images, search for hdr.jpg, but you'll probably get a lot of false positives.


To find Auto Awesome images shared by other Google+ users, you can search for #autoawesome in Google+ and restrict the results to photos. There's also a community for Auto Awesome images.

You can also use Google Image Search and search for [site:plus.google.com inurl:motion.gif] for animated images and [site:plus.google.com inurl:pano.jpg inurl:googleusercontent.com] for panoramas.

{ via Jeremy Milo }

Friday, July 19, 2013

Change Chrome's Search Engine to Google.com

Two years ago, I wrote a post that explained how to change the domain used by Chrome when performing a Google search from the omnibox. The trick still works (thanks, Peter Kasting!), but there's a much simpler way to change the Google domain used by Chrome's omnibox from google.tld (your local Google domain) to google.com.

This is only useful if you're not in the US and you'd like to use google.com to see the latest Google features. The nice thing is that it works in the desktop Chrome, in Chrome for Android and Chrome for iOS.

1. Type google.com/ncr in the address bar and search for something (use Google's search box, not the browser's omnibox).

2. Close Chrome. If you're using the desktop Chrome, close all Chrome windows or click Exit in the menu. If you're using the mobile Chrome, press the home button and use your operating system's multitasking feature to force close Chrome. Here are the instructions for iOS. Android instructions are different, depending on the device you use: some Android devices have a button that shows a list of recent apps, while others require to press and hold the home button or double-tap it. Swipe Chrome's thumbnail to force close it.

3. Launch Chrome again, open a new tab and search for something using Chrome's omnibox.

4. You should see an infobar that asks you: "would you like to search with google.com instead of [your local Google domain]?". Click or tap "switch to google.com" and that's all.


The screenshot is from a Nexus 7, but this should work in Windows, Mac OS, Linux, Android and iOS. Here's a similar screenshot from Chrome for Windows:


You'll also see google.com instead of your local Google domain in Chrome's settings (this feature is not available in Chrome for iOS).


To go back to your local Google domain, you can use similar instructions. Visit google.tld (replace this with your country's Google domain), search for something, restart the browser, search using Chrome's omnibox and click "switch to google.tld" in the infobar that should show up.

{ Thanks, Sushubh Mittal and Jérôme Flipo. }

Sunday, July 14, 2013

Update the Google+ Notification Counter

Google updates the Google+ notification counter automatically, but there's a simple way to force a refresh: mouse over the bell icon. This works for Google+ and all Google services that show the notification icon in the navigation bar.


You can also click the bell icon to refresh the counter and see the latest notifications, but this should be obvious. Most likely, Google anticipates your actions and assumes that you are about to click the bell icon when you mouse over it and that's why it updates the counter.

Another tip: drag the bell icon to the address bar or right-click it and select "open link in new tab" to read the Google+ notifications in a new page.

Saturday, July 13, 2013

Mute All Google+ Posts From a Person or Page

If you follow some people or pages that clutter your Google+ stream or if you'd like to read their posts when you click their circle, there's a very easy way to mute them.

1. Create a new circle. You can call it Muted.

2. Add the people and pages you want to mute.


3. Go to your Google+ stream, click "More" below the search box and select the circle you've created.

4. Click the wheel icon from the "In this circle" box and uncheck "Show posts in Home stream".


5. You can add other people later to the Muted circle. You can also mute other circles or just pick "Amount: Fewer" from the settings menu instead of hiding all the posts.

This works even if someone is in multiple circles. If you add someone to multiple circles and at least one of the circles has the "Show posts in Home stream" setting unchecked, you'll no longer see his posts in the Home stream.

Translate Multilingual Web Pages in Chrome

Google Translate usually detects the predominant language from a text. For example, an English text that includes a few sentences in German and French will be identified as an English text.

If you use the desktop Chrome in English and you visit an English page with a few comments in other languages, Chrome won't translate the page automatically and it won't show the translation bar. To translate the text that's not in English, right-click the page and select "Translate to English".

Here's an example from YouTube:


... and here's the translated page:


Chrome's translation bar says that the page has been translated from English to English. Amazingly, Google translated the comments in Dutch and Portuguese, while preserving the original English text.

If you use the Google Translate site and enter a multilingual text, Google will only translate the text in the predominant language. The same happens when you translate pages. So why is Chrome's translation smarter? Because it slices the text and translates each slice separately.

Please note that this is not limited to English. It's actually the language used by Chrome's interface, which can be changed in the settings, at least if you use Windows.

Here are some examples you can try in Chrome: a YouTube video with multilingual comments, a Google Groups thread with a short text translated in French and Spanish, a list of press releases in both English and French.

Sunday, July 7, 2013

Google Keep Tips

Here are some tips for Google Keep. Since it's a service designed for mobile devices, most of the tips are for the Android app.

Mobile

1. Convert an existing list to a to-do list by tapping "show checkboxes" in the Keep menu.

2. A simple way to add images to a new note: select one or more images in the gallery app or a file manager, use the share feature and select Keep.

3. Copy text from a web page to a new note. Select the text, use the share feature and choose Keep.

4. Save the title of a web page and the URL to a new note. Use the share option from your favorite browser.

5. Add a Keep widget with the latest notes. Resize the widget to show more notes.

6. Reorder notes: long press a note and drag it to a different position.

7. Use colors to organize notes. For example, blue notes are related to work.

8. Take multiple photos from a note. You can then upload the album to Google+ using the share feature.

9. Write short notes quickly: tap "add quick note", type the note and tap "Done".

10. Duplicate a note: open it, tap the share button and select Keep.

11. Tap the microphone to dictate your note and to save your voice recording. You can use Keep as a voice recording app.

12. Find notes with voice recordings: they have a small play icon next to the date.

13. Remove a recording by tapping "x" next to the audio player. You can also remove photos in the same way.

14. Dictate notes without saving audio files by tapping the microphone button from the keyboard.

15. Use Google Voice Search to dictate notes. Start with "note to self" and select Keep from the list of applications after dictating the note.

16. Change the default background color: tap "add quick note", type something, then tap the color palette icon and pick a color.

17. Use the minus operator to exclude keywords when you use the search feature. Use quotes for exact matches. Examples: [milk -buy], ["buy milk"].

Desktop

18. Read your notes online from any device at drive.google.com/keep.

19. Install the Chrome app to read your notes offline when you use your computer.

20. Get permalinks for your notes: open the Google Keep site in a desktop browser, switch to the grid view and click a note.

21. Download voice recordings: open Keep in a desktop browser, click a note, mouse over the voice recording and click "Download".

22. Keyboard shortcuts:

j/k - navigate to the next/previous note
n/p - same as j/k, but also useful for navigating between list items
c - compose a new note
/ - use the search feature
e - archive selected note
# - delete selected note
o - open selected note
Enter - edit selected note
Ctrl+g - toggle between list and grid view
Esc - finish editing a note.

Saturday, July 6, 2013

When You Open Gmail's Compose Box in a New Window

Sometimes little details matter. If you open Gmail's compose box in a new tab or a new window, the formatting options are visible by the default and you no longer have to click the formatting button.


How to open the compose box in a new tab or window? There are at least 7 ways:

Open in a new window
1. Shift+click the compose button
2. Shift+c (keyboard shortcuts need to be enabled)
3. Click the pop-out button from the compose box.

Open in a new tab
1. Ctrl+click the compose button
2. Ctrl+c (keyboard shortcuts need to be enabled)
3. d (keyboard shortcuts need to be enabled)
4. Ctrl+click the pop-out button from the compose box.

Replace Ctrl with Command if you use Mac OS.

Thursday, July 4, 2013

Full-Screen Google Translate

If you use Google Translate to translate a web page, there's a simple way to get more real estate. To hide the navigation bar and the search box, just the click the arrow button next to: [View: Translation|Original]. It's below the red "sign in" button in the following screenshot:


Of course, you can also use Google Chrome, which has a built-in translation feature.

Thursday, June 27, 2013

Find the Number of Gmail Search Results

Gmail doesn't show the real number of search results. A few years ago, tweaking the URL helped you find the number of results, but this doesn't work anymore. Gmail only shows the real number if there are very few search results. Otherwise, you'll see "1-20 of many" and you'll have to keep clicking "next" or use the URL trick to skip many pages of results.


If you really need to find the number, there's a trick that still works. Gmail shows the number of messages for each label, so you can create a new label and then label all the search results.

Here are the steps:

1. enter your search query

2. click the "select" checkbox next to "Refresh" to select all the messages from the page

3. click the new link that shows up: "Select all conversations that match this search"


4. click the "Labels" dropdown, select "Create new" at the bottom of the list and enter the name of a new label. Try something like "Temp", "Temporary", "Search results". Click "Create" and then "OK". You should see a message similar to this one: "All conversations have been added to 'Search results.'"


5. find the label you've created in the left sidebar (you may need to click "More" to find it). Go to that label and you should find the number of search results.


Now you can delete the label from the Gmail sidebar. Click the arrow next to the label and select "Remove label". Obviously, this doesn't delete your messages.

And here are the steps for keyboard shortcut fans:

Shortcut for focusing the search box: /
Enter the query
Shortcut for selecting all messages: * then a
Click "Select all conversations that match this search" (no keyboard shortcut)
Shortcut for the "labels" dropdown: l
Enter the name of the new label
Press the down arrow
Press Enter 3 times
Shortcut for opening a label: g then l
Type the first characters from the label's name
Press Enter

{ Thanks, Eliezer. }

Sunday, June 23, 2013

Attach Images in Gmail Using Drag and Drop

Do you remember the post about attaching photos using drag and drop in Gmail's new compose interface? At that time, this didn't work because Gmail embedded the images instead of attaching them.

Now you can attach photos even when you use drag and drop: just drag the photos to the small area at the bottom of the compose box that says "Attach files here". If you drag photos to the much bigger "Drop file here" area, Gmail will embed them.


{ Thanks, Pierre Maraninchi. }

Tuesday, June 4, 2013

Google Currency Conversion Tips

Here are some tips and tricks that will help you use Google Search as a currency converter. It's an old Google feature that has been updated and it's now more convenient to use and offers more information.

Note: all the Google searches from this post are enclosed by brackets. For example, you should type usd= when you see [usd=]. If you use google.com instead of your country's Google domain, replace "your country's currency" with "US dollar".

1. The quickest way to convert almost any currency to your country's currency is to search for the currency code, followed by "=". For example [gbp=] for British pounds or [czk=] for Czech koruna. You can also search for [100 gbp], [50 czk], so "=" is no longer necessary when you add a number.


2. The quickest way to convert US dollars to euros is to search for [$], but you can also search for [usd=]. Search for [$100], [100$] or [100 usd] to convert 100 US dollars to euros.


3. The quickest way to convert a currency to any other currency is to type the two currency codes. For example, you can search for [gbpeur], [gbp eur] or [gbp to eur] to convert British pounds to euros. This also works when you search for [100 gbpeur], [100 gbp eur] or [100 gbp to eur].


4. To convert multiple amounts of money in different currencies to your country's currency, use a query like [50 gbp + 100 czk + 200 sek]. To convert them to another currency, use a query like [50 gbp + 100 czk + 200 sek = eur].

5. If you don't know currency codes, your queries will be a bit longer, but you can perform any conversion using a single query. Some examples:

[sweden to euro]
[50 sweden = euro]
[sweden to dollar]
[100 sweden = $]
[swedish to japanese currency]
[sweden to japan currency]
[swedish to indian money]
[sweden to india money]

6. You can use multiple currencies when performing simple arithmetical calculations even if you don't know currency codes. For example, search for [50 uk currency + 100 czech money + 200 dollars=euro].


7. After performing any simple currency conversion, Google shows an interactive widget that lets you change the amount of money or the currencies. You can click the currency name to select a different currency from a long list.


8. How to quickly swap the two currencies? Let's assume you search for [1 yen to yuan] and you realize that you need to convert the Chinese yuan to the Japanese yen. Click the "Japanese yen" drop-down and select "Chinese yuan" from the list. Google places the currencies you use at the top of the list.


9. The shortest query that shows Google's currency calculator is [$], but you can also search for [currency], [currency converter], [currency calculator].

10. You can also use currency names instead of codes and country names. For example, search for [lira to real], [1000 forint to pound], [500 yuan to canadian dollar], [500 peso to ringgit]. By default, peso=Mexican peso, crown=Czech koruna, dollar=US dollar, pound=British pound sterling.

11. Google's currency conversions aren't very precise. By default, Google only shows results with 2-digit precision and that's not always enough. If you search for [algerian dinar in eur], Google shows that "1 Algerian Dinar equals 0.01 Euro". To get a precise result, use a simple trick that forces Google to use the old interface: divide by 1 and search for [1 algerian dinar in eur/1]. The new result: 1 Algerian dinar = 0.00964425063 Euros.

Thursday, May 30, 2013

Tips for Gmail's Tabs and Categories

Some of you have already seen this screen in Gmail, which shows that the new inbox tabs have been enabled for your account. If not, click the gears button and see if you can find "Configure inbox". Click this menu item and you can use the new feature. If you can't find "Configure inbox", check back later.


There are 5 tabs:

- social messages from sites like Facebook, Twitter, YouTube or Google+

- promotions: newsletters, offers and other bulk messages

- updates: confirmations, bills, receipts

- forums: messages from online groups, discussion boards, and mailing lists (hidden by default)

- primary: shows all the other messages


It's important to keep in mind that the tabs only show the messages from your inbox. If you have filters that automatically archive messages, you'll not see them in the new tabs.

If you've used the SmartLabels feature from Gmail Labs, you can delete the associated labels and filters after disabling the feature. Filters look like this: Matches: label:social-updates Do this: Skip Inbox. SmartLabels had the following names: social updates, promotions, notifications, forums. Inbox tabs replace the SmartLabels feature: instead of archiving messages, you can keep them in your inbox, but in separate tabs.

Here are some tips that should help you use the new feature:

Inbox tips

1. Click the "+" button to hide or show tabs. You can hide all the tabs except Primary to go back to the old inbox. This doesn't disable categorization, so you can use all the tips from the Categories section (starting from #6).


2. Starred messages are added to the Primary tab, but you can disable this option by clicking the "+" button and unchecking "include starred in Primary".

3. Drag inbox messages to a different category or right-click and select "move to tab".

4. Tabs show the number of unread messages and a list of senders. The inbox unread count only shows the number of unread messages from the Primary tab.

5. Keyboard shortcuts:
` Go to the next inbox tab
~ Go to previous inbox tab

Categories tips

6. There's a new Categories list in the sidebar that lets you find all your notifications, promotions, social updates, not just the messages from your inbox. The list is still displayed if you hide some inbox tabs, but you can collapse it. Click "Categories" to see the messages from all the categories.


7. Search for category:updates, category:social, category:forums, category:promotions to find these messages.

8. You can create filters that use these categories. For example, create a filter that forwards all forum-related messages to a different address.

9. Create filters that exclude messages from these categories by enabling "Exclude from SmartLabel categorization" in the filter editing dialog.

10. Help Gmail categorize messages by creating filters and selecting "categorize as". For example, send all messages that include "unsubscribe" to the Promotions category.


11. You can also drag messages to the sidebar categories and use feature like "move to" or "labels" to categorize messages. The list of categories is displayed below your labels.

Tuesday, May 28, 2013

Find Gmail Receipts

Here's a way to find your receipt messages from Gmail: search for label:^smartlabel_receipt. This feature is powered by the Smart Label experiment from Gmail Labs, but you don't need to enable that experiment.


I've found receipts from PayPal, Google Play and Google Checkout, order confirmations from eBay, Amazon and other shopping sites. Gmail automatically detects receipts, just like it finds notifications, social updates, forum messages and other categories of messages.

The Smart Label feature from Gmail Labs creates filters that automatically label messages and convert system labels like ^smartlabel_receipt to user labels like Receipts. You can manually do that for receipts: click the arrow from the search box, type label:^smartlabel_receipt in the "has the words" field, click "create filter with this search", click "OK" and ignore the warning, select "Apply the label" and then "new label", create a label called "Receipts", check "Also apply filter to * matching conversations" and click "Create filter". You'll get a receipts label:

Tuesday, May 7, 2013

When Did You Create Your Gmail Account?

Here's a simple way to find when you've created your Gmail account. You can always find the oldest message from your account by visiting this page https://mail.google.com/mail/#all/p1000000: you'll get an error message and Gmail will redirect to a page that shows the oldest messages from your account. The problem is that this is not a reliable way to determine when the account was created: maybe you've deleted some messages, maybe you've imported messages from other accounts.

If you've joined Google+, you can quickly find the exact date. Go to Google Takeout, click "Transfer your Google+ connections to another account" (don't worry, you don't have to do that), enter your password and you can see the date when you've created your Gmail account in the blue box at the bottom of the page.


Why would you need this information? For example, Google's account recovery form includes a question about this. "If you find yourself locked out of your account and none of your other recovery options work, your last option is to visit our password-assistance page and fill out our Account Recovery form. (...) Since Google doesn't collect a lot of information about you when you sign up for an account, we'll ask you questions like when you created your account, what Google services you use, and who you email frequently (if you use Gmail)."

I haven't tested this, but I assume this trick also works for non-Gmail Google accounts.

{ via TechAirlines }